A blog for educators. I will try to include how you can use computing in all areas of the curriculum,including what went well and how you can make it better.
This term in history we have been looking at the Stone Age. As part of this topic we looked at Stone Age weaponry. We decided to create our own advert for weapons.
First:
We wrote our adverts in pairs and we had to use:
A question for the audience.
Good persuasive vocabulary.
Second:
We had to write up our advert onto large prompt sheets. This made it easier for children to read as I record, I usually hold this up behind the camera.
After this the children split off into their pairs to rehearse recording, this is a great opportunity for children to evaluate and edit their work, checking it makes sense and recording any changes in their books.
Next:
We choose a video from YouTube about the Stone Age to be running in the background of our advert. We converted this via a YouTube to mp4 converter from the internet, very easy to do. We made some amendments to the video using iMovie (deleting unnecessary video from the beginning).
I recently went on a training course with @musicmind. Nina Jackson was wonderful, sharing ideas for using iPads with SEND children. I will go through some of the apps we used, and how this has helped me in the classroom via other posts coming soon. One of the ideas I wanted to share today was how I used YakitKids app following the training session with Nina.
I will add the video next week, when the building is open following the building work.
The Lesson
As part of Queen Elizabeth's 90th birthday celebrations we decided to make a video for her 90 years celebration.
I love to start a lesson with a research project. There are a few key points we must use when doing research in our class:
Use Google to search for appropriate content - We usually add the phrase 'for children' or 'for kids' to the end of our search questions.
Examine the results list, choose the most appropriate results for your research.
Ensure the facts are not only relevant but interesting for the reader/ viewer.
Write your facts using subheadings and bullet points to simplify and organise them.
I like children to work in pairs for this type of task. These will generally be mixed ability pairs (keeping those who struggle with writing engaged). In my experience the children find it easier to learn and remember information when they are engaged in the research themselves.
When we had acquired the 5 facts, we were ready to start our video.
The children were given the choice of which app they could use to make their video, YAKiT Kids or Videoscribe Anywhere. Having previously used both these apps, a quick refresher in key functions was all that was needed.
See links at the bottom for a quick guide to using YAKiT Kids and Videoscribe Anywhere.
Evaluation Pros:
Both apps are very child friendly.
A great way of editing and evaluating your own work: Are all words spelt correctly? Does your work make sense? Is it interesting? Is it clear for the viewer/ reader?
Visually appealing.
High levels of engagement from children of all abilities.
Great opportunities for 'app smashing': Internet, photos, sound, music.
Improvements for next time:
Be clear on what items the children can use: Having a singing devil or zombie may not be appropriate on all videos.Facial features and sparkles or hearts are fine, but I had to suggest some changes to children's work when we had some singing poops (not very regal).
When recording voice or music for your video, leave a 1-2 second gap at the end of your recording before pressing stop. This allows for overlaps if you join videos together, and, or for any transitions in the videos.
When using Videotime Anywhere, remind children to be careful pinching the screen.It won't affect the end product, but we have lost parts of our video production by pinching them too small.
On Videoscribe Anywhere, transition lengths are at the bottom of the screen. Children may need to adjust these slightly or videos can become far too long, and the viewer can lose interest. We generally say between 3 and 6 seconds a scene is plenty. However, this can depend on the amount of content in each scene.
Now that is a few improvements I have suggested, but if you can avoid the danger areas I ran into to begin with, your lesson will run much smoother, making it easier for you and your class.
YAKiT Kids is a fun colorful app which allows students to easily bring story characters, inanimate objects, and historical figures to life in short creative videos. The app will walk your students through just a few steps to create a talking mouth on top of any image. These animated clips are short and there are many animated features such as cartoon eyes that can be created. This is a great platform for students to be creative based on their writing and research.
Step 1:
Open App and press 'start new'
Step 2:
Choose one of the following:
Take a photo - photos will need to be enabled in settings, if this is not done, go to settings>YAKiT Kids> press to enable photos/ microphone/ camera
Choose a photo from your camera roll. You can save Google pictures to file, and use these as you make your videos.
Web search photo. This is a search engine run by YAKiT, it does use filtering technology, but there is no guarantee with this. I personally am not keen on this, as it can be much slower than going to Google and saving a picture. If you talk to children about e-safety regularly they should be used to doing their own Google image searches.
Step 3:
Here you can add to your picture, add facial features and adjust by pinching to change size and position.
To alter, remove, or copy an addition just press the square containing the object.
To match the size of an object, click it and select copy.
Step 4:
Press record to add sound - this will show you a count down, try not to talk to soon. Leave 1-2 seconds at the end of recording to allow for transition.
When completed, you can change the pitch of the sound, by selecting pitch or re-record if necessary. Make sure you decide prior to the lesson if you want the children to be able to change the pitch. I would advise that the children have opportunity to play with this beforehand, and it may cause giggles.
From here your picture is ready to save to your camera roll. There are other options available but none of these normally work with WiFi within schools
Further Notes:
You can add further scenes to create a video by selecting add scene.
Children can use AirDrop to send their finished article to your device.
Children could decide to AirPlay their article to the board when complete, to share with the class.
Sometimes I like to add music instead. To do this I play the tune I require at the time when I am recording.
I recently provided staff training for computing. There is so much to learn and use in computing that I started with just basics, which included @bookcreatorapp.
I love using book creator in class. It is a brilliant tool for children to edit and evaluate their own work. This is how a Year 5 teacher used it after the training.
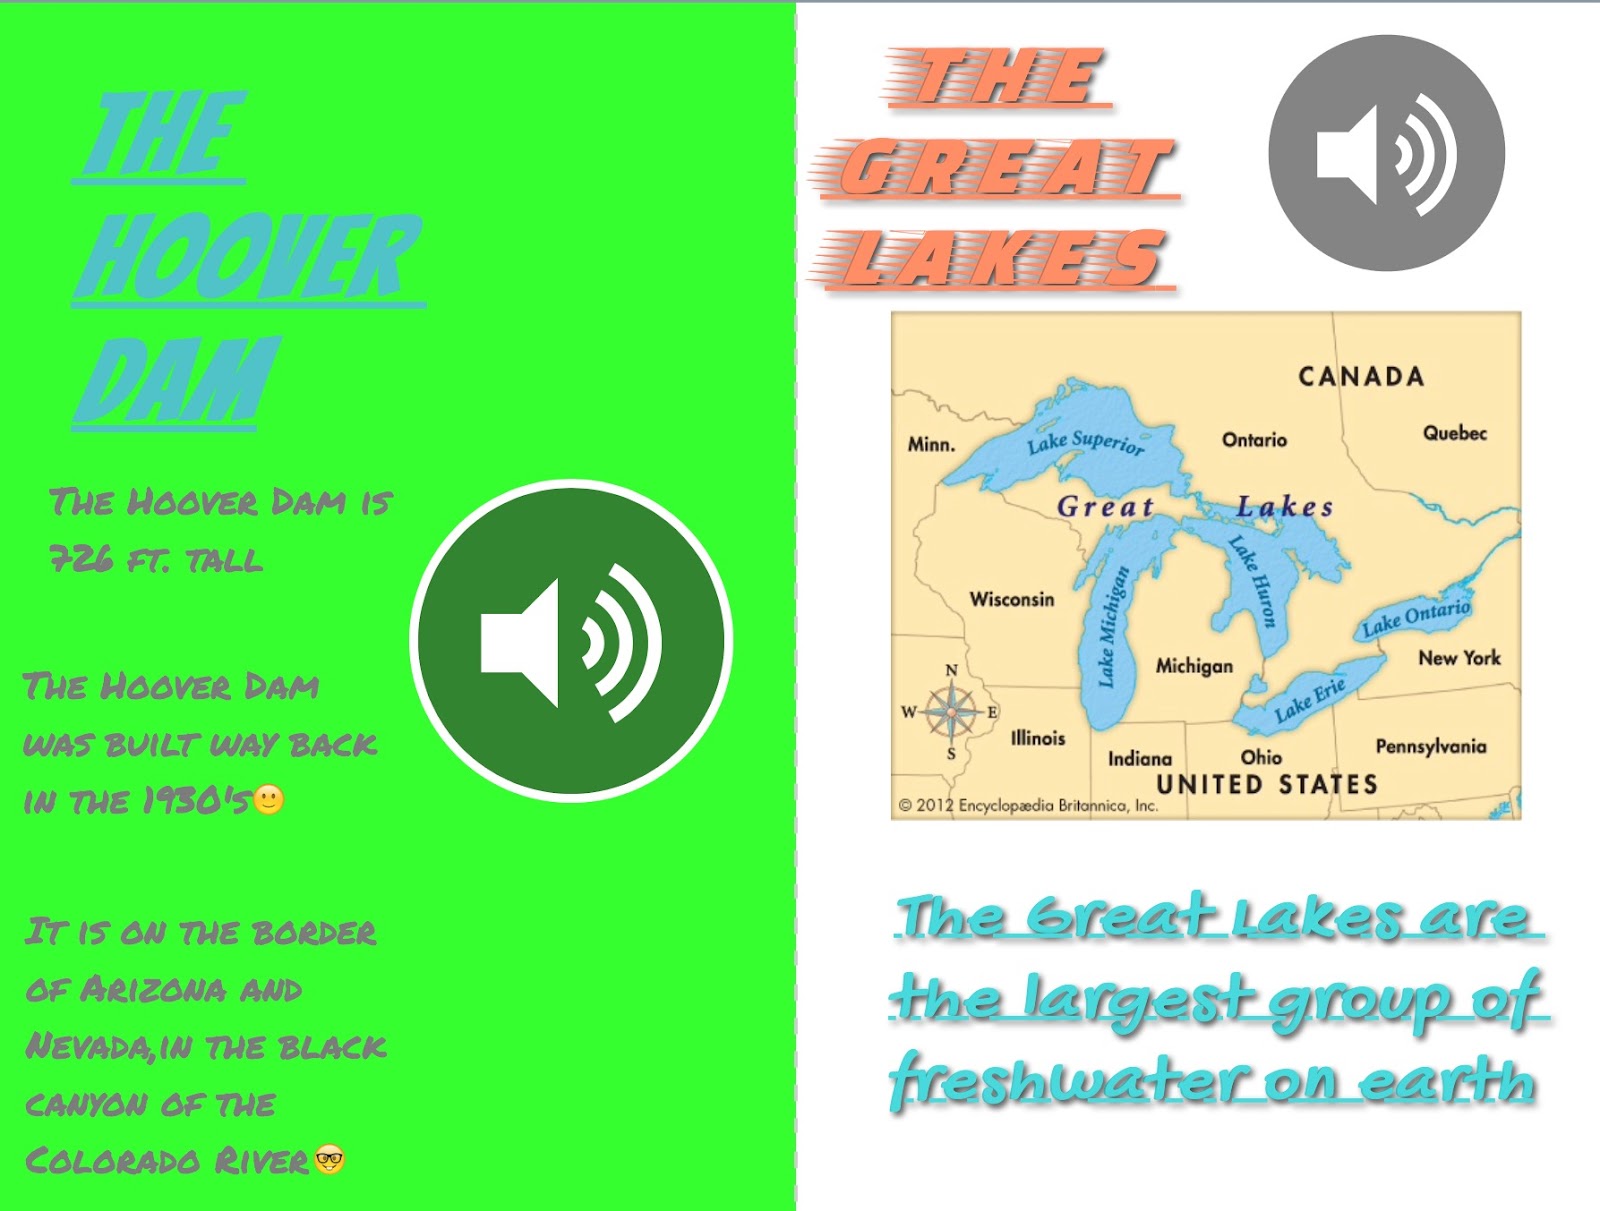
Year 5 were about to start a topic on North America. The class teacher decided to start with a research project, which worked out amazingly well. The children working in pairs were asked to research 3 examples of physical geography of North America such as rivers, mountains or volcanoes, on Google. Then, they had to make notes on what they considered to be the top 5 important facts about the place/ object chosen.
When all the research was complete the children had to compile a non-fiction reference book about their findings. The key points they had to include were:
Headings
Subheadings
Images
Labelling
Facts
Photos
And to make it appealing to other children
And if they wanted, audio
All of the books turned out wonderfully and the children were really excited about their accomplishments. See videos and photos below of the completed work below.
Well, I have been off school for 4 weeks. School has building work currently being completed so has been out of bounds all holidays. We should be allowed back in next week, but I have a few days to prepare the whole classroom before the new class arrives.
I am here contemplating how I can prepare for first day at the moment. I'm lucky, I have the last two years planning already set up, but as you know, you cannot stick with the same plans and hope the children conform to your plans. The best thing I can do now is to plan, I want to re-jig some themes to match up better with each other. I am also looking through some of last years computer projects to see how we can improve on them this year.
I am going to share some of our projects; to get back into the right frame of mind.