Step 1:
Ensure Videoscribe Anywhere has access to photos, the last thing you want in the middle of a lesson is 30 children asking what to do when photos don't work.
settings>VideoScribe Anywhere>Allow
Open the app and login/ register.
The press to start a new project.
Step 2:
Quick View
Add Picture:
VideoScribe Anywhere has it own store of images pre-programmed into the app. These are great but there are not many of them.
- When searching in the app, keep the search short and general, too specific and it will limit the results.
If you cannot find the images you require you can import photos from file or images from the internet, they will not have the same visual impact as the pre-programmed images, but it still looks good.
If choosing images from the internet, I find it easier to save to camera roll and then import using the camera icon, rather than using the VideoScribe search engine, which runs slowly in our classroom.
- Once added, images can be manipulated for size and direction by pinching.
- The timing of the image can also be changed, but I will go into that more later.
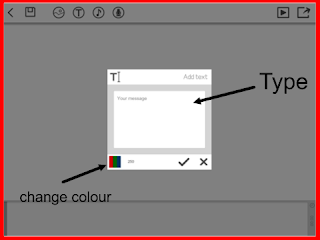
Add Text:
Text direction and size can be changed the same as images.
Add Music:
- Here you can add music to accompany your video.
- Press play to listen to the tracks and tick when you are happy with your selection.
*Press the play button after each new element to see if you are happy with how it looks so far. *
Some points to note
- To add or remove an element just press it and press the trash can.
- Always save before leaving the app, it doesn't always automatically save, we have lost pieces of work completely before.
- Timings are set automatically and with several elements to your video, the time can rack up. I always suggest setting the times at 6/7 seconds, but if you play to preview between each element, you can see if the timings are too long or short.
- When you are ready for the next scene move the screen in any direction to start, ensuring that the last scene cannot be seen.
Step 3:
- Press 'send to' and you will find the link to sending your video to the sch.co website, where your videos will be stored for viewing.
- These videos can then be linked and QR codes generated.
It will ask you if you want to buy credits, but if you use the same login with your children you will earn credits.
*I have never had to buy any credits yet.
Some of our Projects:
Lesson - TBA
Lesson - TBA
Contact Details:
Facebook: Tonihammys Computing and Teaching
Email: ToniHammy
Youtube: ToniHammy


No comments:
Post a Comment